Planning a pilgrimage to the high Himalayas is a beautiful blend of deep devotion and practical preparation. The question of how many days you need for a Kedarnath Yatra is one of the most important things to figure out before you pack your bags. Nestled at an altitude of 3,583 meters in the Garhwal Himalayan range of Uttarakhand, this ancient temple demands your time, energy, and respect.
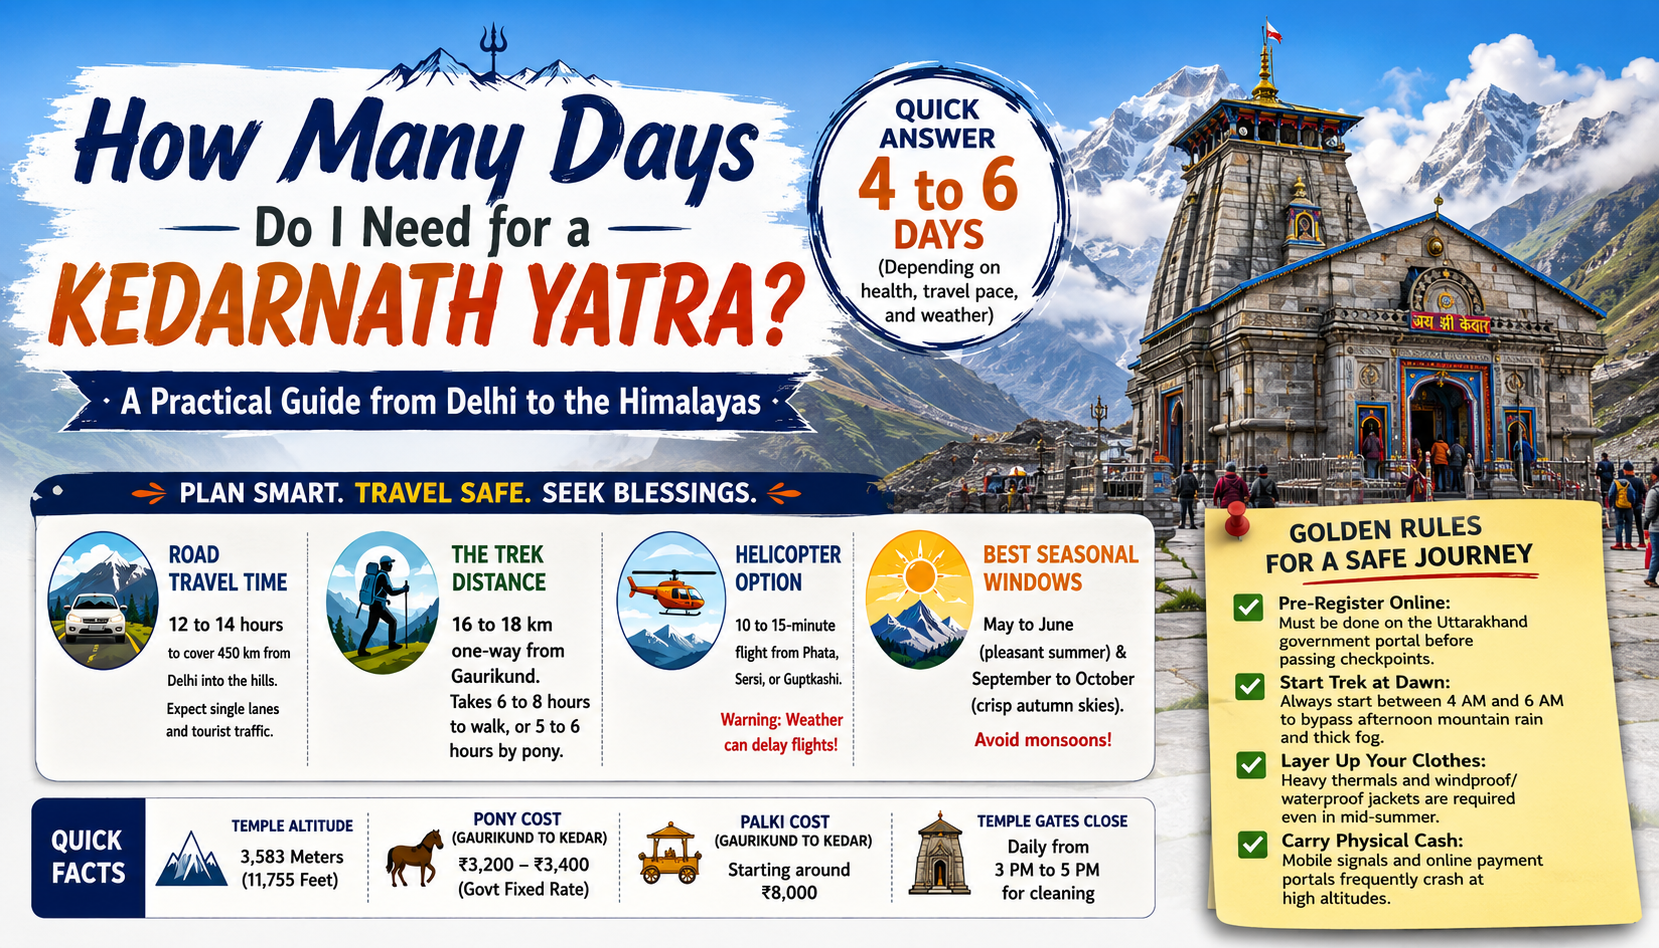
To give you a direct answer, a proper Kedarnath Yatra from Delhi requires anywhere between 4 to 6 days. The exact number depends entirely on your physical health, your chosen budget, and how much you want to rush through the mountains.
Let us look at a real story to help put things into perspective. For example, Mohita, a professional from Delhi, came to Kedarnath last season. Mohita initially thought that she can do the whole trip in only 3 days, driving non-stop. However, once she hit the winding mountain roads past Rishikesh and experienced the steep climb from Gaurikund, she realized that the mountains operate on their own clock. She had to extend her trip to 5 days because of sudden afternoon rainfall and exhaustion from the high altitude. Her journey taught her that planning a buffer day is not a luxury, it is a absolute necessity when traveling through these high mountain terrains.
Key Logistics That Dictate Your Trip Duration
You cannot calculate your travel time by looking only at maps or linear distances. Several factors unique to the Himalayan geography play a heavy role in how long your journey takes.
Long Distance Road Travel
The drive from Delhi to the base camps like Sonprayag, Phata, or Guptkashi covers roughly 450 kilometers. While that sounds manageable on a plains highway, mountain roads are entirely different. This journey easily takes 12 to 14 hours. Heavy tourist traffic, narrow single-lane roads, and occasional rock clearings mean you must allocate two full days just for traveling to the base and returning home.
The Grueling Trek from Gaurikund
The actual trekking path starts at Gaurikund and runs for about 16 to 18 kilometers to the temple gates. For an average adult with decent fitness, walking this uphill trail takes 6 to 8 hours one-way. If you choose helper options like a pony or a palki, it still takes about 5 to 6 hours due to the sheer steepness and crowded paths.
Helicopter Travel Options
If you have booked a helicopter ride from aviation pads in Phata, Sersi, or Guptkashi, your flying time to the Kedarnath helipad is a quick 10 to 15 minutes. While this saves you a massive amount of physical strain and almost two days of trekking time, helicopters are at the complete mercy of mountain weather. Fog, strong winds, and heavy downpours can cancel flights for hours or even days, forcing you to wait at the helipad.
Weather and Seasonal Shifts
The ideal windows to plan your yatra are May to June and September to October. The summer months have lovely daytime temperatures, the autumn months clear crisp skies. The months of July and August (monsoon months) are quite unpredictable for travel. Landslides and broken roads can stall your itinerary by 24 to 48 hours, making buffer days vital during the rainy season.
Detailed Itinerary Options for the Yatra
Every pilgrim moves at their own speed. Here are three itineraries that have been tried and tested to suit different styles of travel and levels of fitness.
Quick Route (4 Days)
This itinerary is for travellers who do not have sufficient time, have a high level of stamina and can sit long hours in cars or buses.
-
Day 1: Delhi to Guptkashi or Sitapur You can begin with a night or very early morning drive from Delhi. You travel through Haridwar and Rishikesh, ascending the hilly tracks along the Alaknanda and Mandakini rivers. Reach your hotel at Guptkashi or Sitapur late evening for Dinner & a quick night of sleep.
-
Day 2: From the Base to Gaurikund & Trek to Kedarnath You are up by 4 AM to catch the local shuttle from Sonprayag to Gaurikund. You will start your 16 kilometre trek at dawn. Whether you walk or take a pony, you aim to reach the Kedarnath camp by mid-afternoon. You check into a basic guest house, join the evening temple aarti, and rest.
-
Day 3: Early Morning Darshan and Descent to Base You line up early for morning darshan, catch the glorious sight of the sun striking the Kedarnath peak, and start walking back down to Gaurikund by 9 AM. You reach the base by evening and drive down to a nearby town like Rudraprayag or Guptkashi to sleep.
-
Day 4: Drive back to Delhi You spend the final day completing the 10 to 12 hour drive from the mountains back to Delhi, arriving late at night.
The Moderate Route (5 Days)
This is the most popular, highly recommended choice. It is moderately paced, less physically exerting and time to relish the spiritual aura.
-
Day 1: Delhi to Haridwar
-
Day 2: Haridwar to Sonprayag
-
Day 3: Trek to Kedarnath
-
Day 4: Descend to Rishikesh
-
Day 5: Return to Delhi
-
Day 1: Delhi to Haridwar or Rishikesh You can conveniently leave Delhi by train or car and reach Haridwar or Rishikesh in about 5 to 6 hours. In the evening, you can attend the beautiful Ganga Aarti at Har ki Pauri thus acclimatising your body to the changing air.
-
Day 2: Haridwar to Sonprayag or Guptkashi You embark on an 8 to 10 hour morning drive into the mountains. Stopping at Devprayag to see the confluence of the Bhagirathi and Alaknanda rivers breaks up the journey beautifully. You overnight at hotel at Sonprayag or Guptkashi.
-
Day 3: Trek from Gaurikund to Kedarnath Temple You start your trek from Gaurikund with renewed energy and enthusiasm. You take your time and get to the top in 7 hours. Enjoy the calm evening atmosphere of the valley and stay overnight at the temple.
-
Day 4: Morning Puja & Journey down to Rishikesh You have a peaceful morning darshan, then descend the mountain to Gaurikund. Your driver will meet you at Sonprayag and drive you down the mountain roads to Rishikesh for a comfortable overnight stay.
-
Day 5: Rishikesh to New Delhi Enjoy a leisurely morning by the cafes of Rishikesh before the smooth 5 hour drive back to Delhi.
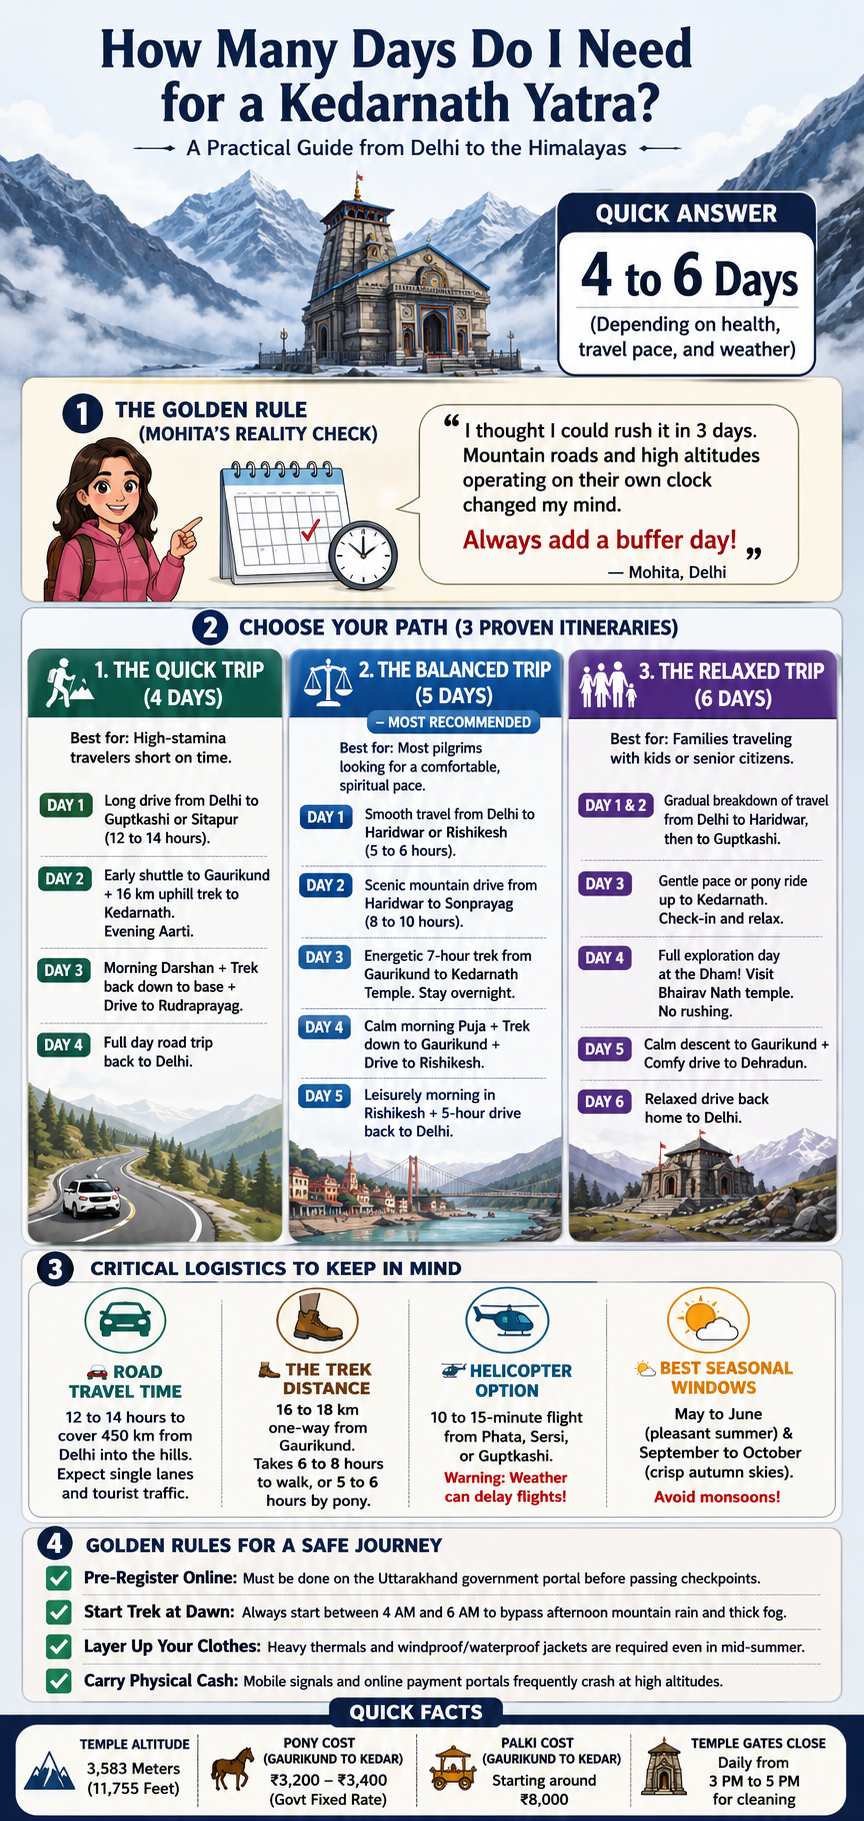
The Easy Way (6 Days)
This is a perfect plan for families having senior citizens, kids or anyone who needs time to get acclimatised to the high altitudes and visit nearby shrines.
-
Day 1: Delhi to Haridwar A slow drive or train ride to Haridwar, evening exploring local markets and good rest.
-
Day 2: Haridwar to Guptkashi An easy drive through the hills with regular stops for fresh mountain water and meals culminating in an early night stay in Guptkashi.
-
Day 3: Kedarnath to Guptkashi You go to the temple. By going at a relaxed pace or using a pony you make sure that you don’t drain your body of energy. You go to your room to register and relax.
-
Day 4: Full Day at the Dham Exploration You don’t hurry down, but spend the whole day in the valley. You can visit the Bhairav Nath Temple on a nearby hill and relax in the surrounding meadows and take part in the morning and evening rituals without any hassle.
-
Day 5: Gaurikund Descent, Drive to Dehradun You walk easily along the trail, catch your vehicle and go to Dehradun or Rishikesh to enjoy a comfortable stay in a premium hotel.
-
Day 6: Drive back to Delhi You finish off the last leg of your journey back to Delhi, physically refreshed and spiritually satisfied.
Must-Know Travel Tips for a Well-Organized Pilgrimage
Here are a few professional planning suggestions for adhering to your selected timeline:
-
Register online in advance: All pilgrims are required to register online on the Uttarakhand government’s tourism portal or app before reaching checkpoints.
-
Start Your Treks at Dawn: Always start walking from Gaurikund between 4 AM and 6 AM. The mountain weather is generally clear in the mornings, whereas heavy fog and rain clouds regularly roll in by 2 PM.
-
Pack Heavy Woolens: Even if you visit in June, night temperatures at the top can instantly plunge close to freezing. Thermal layers, windproof jackets, gloves, and sturdy trekking shoes are non-negotiable items.
-
Carry Physical Cash: Mobile networks behave unpredictably in the high valley. Digital payment systems often fail because of poor connectivity, so bring plenty of hard cash for food, mule rides and emergency needs.
Frequently Asked Questions
Is oxygen level low in Kedarnath?
Yes, the atmospheric oxygen level is noticeably lower than in the plains because the temple is located at an altitude of nearly 11,755 feet. Most healthy individuals feel slight breathlessness when walking uphill. The best way is to walk slowly, not rush and take deep breaths. If you have a medical history of asthma or heart trouble, consult doctor before travelling and carry portable oxygen canister.
How risky is Kedarnath trek?
The trek is moderately risky due to the steep terrain, unpredictable mountain weather and rapidly changing temperatures. The path is fully paved with safety rails, medical camps and water stations making it much less dangerous. The primary risks come from pushing your body too hard without resting or ignoring early warning signs of mountain sickness.
Which is harder Kedarnath or Badrinath?
The Kedarnath journey is considerably harder. Badrinath is completely connected by motorable roads, allowing you to drive right up to the temple gates with zero trekking required. Kedarnath demands a challenging 16 to 18 kilometer uphill mountain climb on foot or animal back, making it physically taxing.
What is the food like in Kedarnath?
The food served throughout the trek route and near the temple is strictly vegetarian, simple, and wholesome. You will mostly find local dhabas and food stalls serving hot plates of dal, rice, rotis, sabzi, maggi, and paranthas. Onion and garlic are generally avoided by cooking staff. While choices are basic, the food is served fresh and hot to keep you warm.
What type of clothing to wear in Kedarnath?
You should pack your clothing in multiple layers. Bring high-quality thermals, heavy fleece sweaters, a thick windproof waterproof jacket, woolen socks, and gloves. The weather can change from bright sunshine to a freezing rainstorm within minutes, so wearing layers allows you to adjust to the temperature easily.
What is famous in Kedarnath to buy?
Kedarnath is a spiritual destination rather than a commercial shopping hub. Pilgrims love to buy small religious souvenirs to bring back home. This includes genuine crystal spatik malas, rudraksha beads, small brass idols of Lord Shiva, copper rings, dry prasad boxes, and framed pictures of the temple wrapped in holy threads.
What is the special item in Kedarnath?
The ultimate special item is the dry Brahma Kamal flower or the local herbal prasad offered at the shrine. Another unique item is the small stone replica of the texturally distinct triangular lingam of the Kedarnath temple, which devotees place in their home prayer rooms.
What is the cost of a pony in Kedarnath?
The official government-fixed rate for a pony ride from Gaurikund up to Kedarnath ranges around 3,200 to 3,400 rupees. The return journey down from the temple costs about 2,200 to 2,400 rupees. It is best to book these services through the official prepaid registration counters at Gaurikund to avoid dealing with inflated prices from unauthorized handlers.
Is Palki available in Kedarnath?
Yes, palkis or palanquins carried by four porters are widely available for senior citizens or pilgrims facing major physical challenges. The official government price for a palki from Gaurikund to Kedarnath is roughly 8,000 rupees for passengers under 90 kilograms, while a same-day round trip costs around 12,000 rupees.
What is the timing of pooja in Kedarnath?
The temple gates open for general public darshan around 6 AM or 7 AM. A long afternoon closure happens between 3 PM and 5 PM for cleaning and deity rest. The grand evening aarti begins around 6 PM and finishes by 7:30 PM. Special individual morning pujas like the Mahabhishek can be booked online and take place between 4 AM and 6 AM.
Conclusion
Determining your ideal travel time comes down to respect for your physical limitations and the wild nature of the Himalayas. If you are strapped for time and have strong health, a crisp 4 day plan will get you to the shrine and back. If you prefer a safe, structured, and manageable journey, choose the popular 5 day timeline. For families and those who wish to soak in every bit of peace the valley provides, a relaxed 6 day journey is the ultimate choice. Make room to attune yourself with the divine, to listen to your body and allow the spiritual energy of the mountains to lead you.
Author Bio
Captain is a seasoned explorer who has spent years navigating the winding roads of the Himalayas. With a knack for finding the best local tea stalls and hidden viewpoints, Captain focuses on making travel accessible, honest, and practical for everyone, whether you are budgeting for a family pilgrimage or seeking a quiet trek.

My spouse and I absolutely love your blog and find almost all of your post’s to be exactly I’m looking for. Does one offer guest writers to write content for yourself? I wouldn’t mind creating a post or elaborating on many of the subjects you write in relation to here. Again, awesome site!